Prerequisites
E.g. for Ubuntu 16.04 (64-bit)
sudo dpkg --add-architecture i386
sudo apt-get update
sudo apt-get install g++-5-multilib
sudo apt-get install curl dosfstools gawk g++-multilib gcc-multilib lib32z1-dev libcrypto++9v5:i386 libcrypto++-dev:i386 liblzo2-dev:i386 lzop libsdl1.2-dev libstdc++-5-dev:i386 libusb-1.0-0:i386 libusb-1.0-0-dev:i386 uuid-dev:i386 texinfo chrpath
cd /usr/lib; sudo ln -s libcrypto++.so.9.0.0 libcryptopp.so.6
Installation
V2.1 and Later Images
Setup/Configure
Since OpenEmbedded requires several git repositories to be available to build our images, starting with V2.1 images we are using a utility called 'repo'. The repo manifest manages the various git repositories and their branches. (more on repo: http://code.google.com/p/git-repo/ )
Install the repo bootstrap binary:
mkdir ~/bin
export PATH=~/bin:$PATH
curl http://commondatastorage.googleapis.com/git-repo-downloads/repo
>
 ~/bin/repo
chmod a+x ~/bin/repo
Alternatively, in Ubuntu, 'repo' may be installed as part of the 'phablet-tools' package.
Create a directory for your oe-core setup to live in and clone the meta information. For the Vx.y... Image use the branch LinuxImageVx.y..., e.g. for the V2.7 Image use the branch LinuxImageV2.7
mkdir oe-core
cd oe-core
repo init -u http://git.toradex.com/toradex-bsp-platform.git -b LinuxImageV2.7
repo sync
Source the file 'export' to setup the environment. On first invocation this also copies a sample configuration to build/conf/*.conf.
. export
Note: Sourcing 'export' configures the shell environment for the current shell session. It must be entered whenever a new shell session is opened for use with OpenEmbedded.
local.conf
Adapt build/conf/local.conf to your needs.
Set MACHINE to the module type you are planning to build for. Our BSP layers provide the following machines:
| Machine Name |
|---|
| apalis-imx6 |
| apalis-t30 |
| apalis-tk1 |
| apalis-tk1-mainline |
| colibri-imx6 |
| colibri-imx7 |
| colibri-t20 |
| colibri-t30 |
| colibri-vf |
e.g. set in local.conf
MACHINE ?= "apalis-imx6"
Note: You can explicitly override the MACHINE setting on the cmdline, set the variable MACHINE when calling the bitbake command (e.g. MACHINE=apalis-imx6 bitbake...)
If you want to build for the apalis-imx6, colibri-imx6 or colibri_imx7 machine some downloads require you to read and accept the NXP
®
/Freescale EULA available in layers/meta-freescale/EULA. You have to state your acceptance by adding the following line to your local.conf file:
ACCEPT_FSL_EULA = "1"
Building
#setup the environment
cd
cd oe-core
. export
Build the image, bitbake automatically logs console output to timestamped files in build/tmp-glibc/log/cooker/$MACHINE/.
Note: With oe-core you need to be in the directory 'build' when you execute bitbake.
Note2: This will at first build take hours, download lots of stuff and fill 'build/out-glibc', so have at least 60 GByte free.
In this example we use Qt 5:
$ bitbake -k meta-toolchain-qt5
This can take several hours.
Install the SDK
Install the Qt toolchain on your development computer (replace x86_64 with i686 if you use a 32-bit machine, also note the -S parameter which preserves the relocation scripts, we need them later on):
../deploy/sdk/angstrom-glibc-x86_64-armv7at2hf-neon-v2016.12-toolchain.sh -S
For Qt 4.8, with a V2.4 image the above would be on the lines of
./out-glibc/deploy/sdk/angstrom-glibc-x86_64-armv7at2hf-vfp-neon-toolchain-qte-v2014.12.sh -S
The default destination folder is /usr/local/oecore-x86_64 or /usr/local/oecore-i686 (depending on architecture).
For Qt 5, starting qmake should succeed now:
$ /usr/local/oecore-x86_64/sysroots/x86_64-angstromsdk-linux/usr/bin/qt5/qmake
Usage: /usr/local/oecore-x86_64/sysroots/x86_64-angstromsdk-linux/usr/bin/qt5/qmake [mode] [options] [files]
...
Install Qt Creator
Configure Qt Creator
Before starting Qt Creator, we have to export some build environment variables. Qt uses special configuration files to describe the build environment called mkspecs (they specify which compiler, linker or other tools to use). However, this configuration files still need to know where the compiler (or cross-compiler in our case) is located. The SDK created a script which does all the hard work.
Source the script as follows:
. /usr/local/oecore-x86_64/environment-setup-armv7at2hf-neon-angstrom-linux-gnueabi
The environment variable OE_QMAKE_CXX should then show something along this line:
$ echo $OE_QMAKE_CXX
arm-angstrom-linux-gnueabi-g++ -march=armv7-a -mthumb -mfpu=neon -mfloat-abi=hard --sysroot=/usr/local/oecore-x86_64/sysroots/armv7at2hf-neon-angstrom-linux-gnueabi
Download & Installing QtCreator 5.8 +
$ wget -c http://download.qt.io/official_releases/qt/5.10/5.10.0/qt-opensource-linux-x64-5.10.0.run

...
Length: 1040997932 (993M)
Saving to: ´qt-opensource-linux-x64-5.10.0.run´

$
Now, start Qt Creator in the shell where you sourced the script:
qtcreator
Add the Target Device
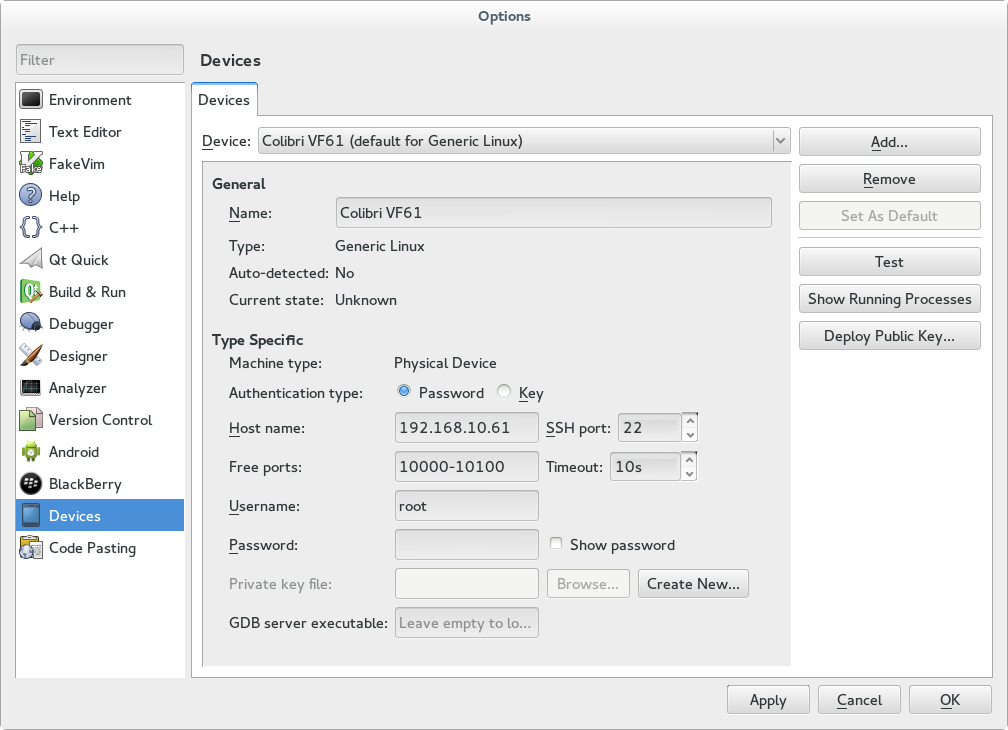
Go to Tools =>Options. In the left panel, click on Devices and add a new device representing the target Colibri Module:
- Press Add and choose Generic Linux Device
- Specifiy a name (e.g. Apalis iMX6)
- Fill in the device's IP address
- Authentication on our modules by default: Password, User ''root'', empty password
Add Kit
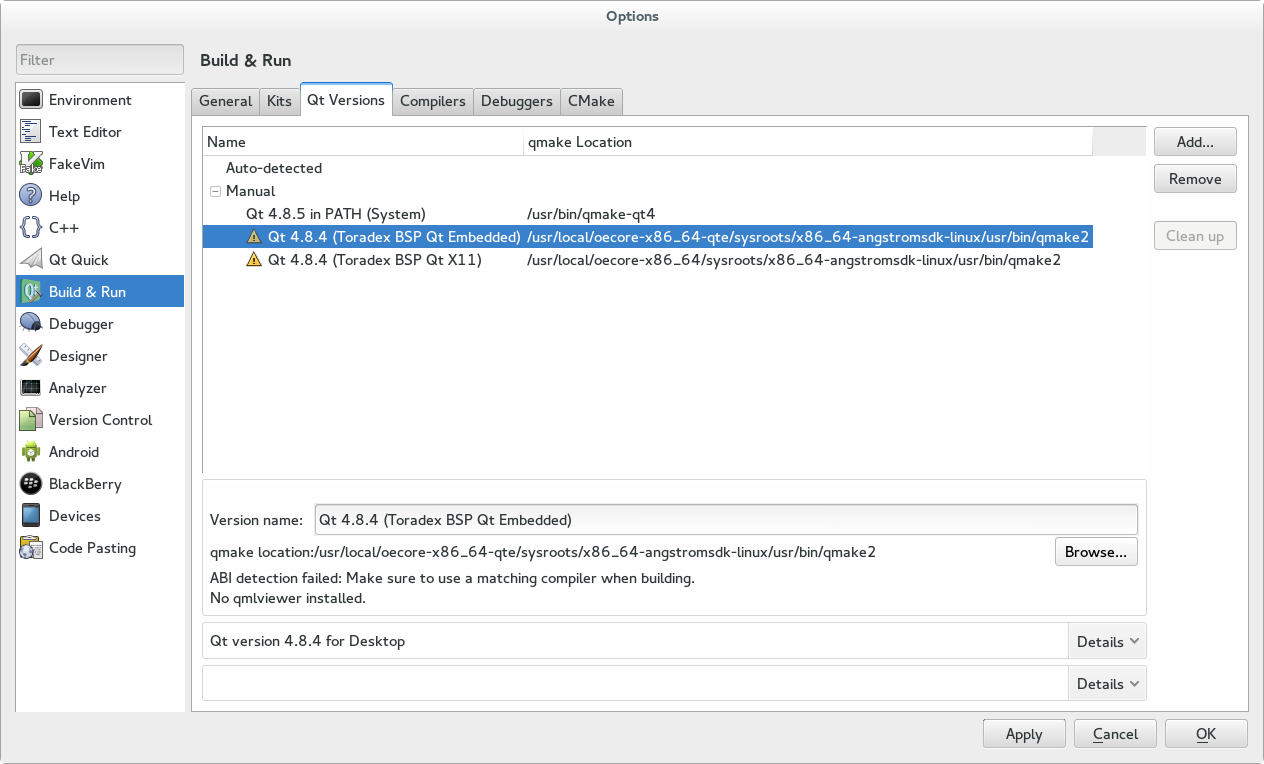
In the left panel, click on Build & Run and configure in the following tabs:
- Qt Versions:
- Press Add
- Choose /usr/local/oecore-x86_64/sysroots/x86_64-angstromsdk-linux/usr/bin/qmake2
- Fill in a name
- Compilers:
- Press Add => Gcc
- Name: GCC (Qt Embedded)
- Compiler path: /usr/local/oecore-x86_64/sysroots/x86_64-angstromsdk-linux/usr/bin/arm-angstrom-linux-gnueabi/arm-angstrom-linux-gnueabi-g++
- ABI (should be detected automatically): arm-linux-generic-elf-32bit

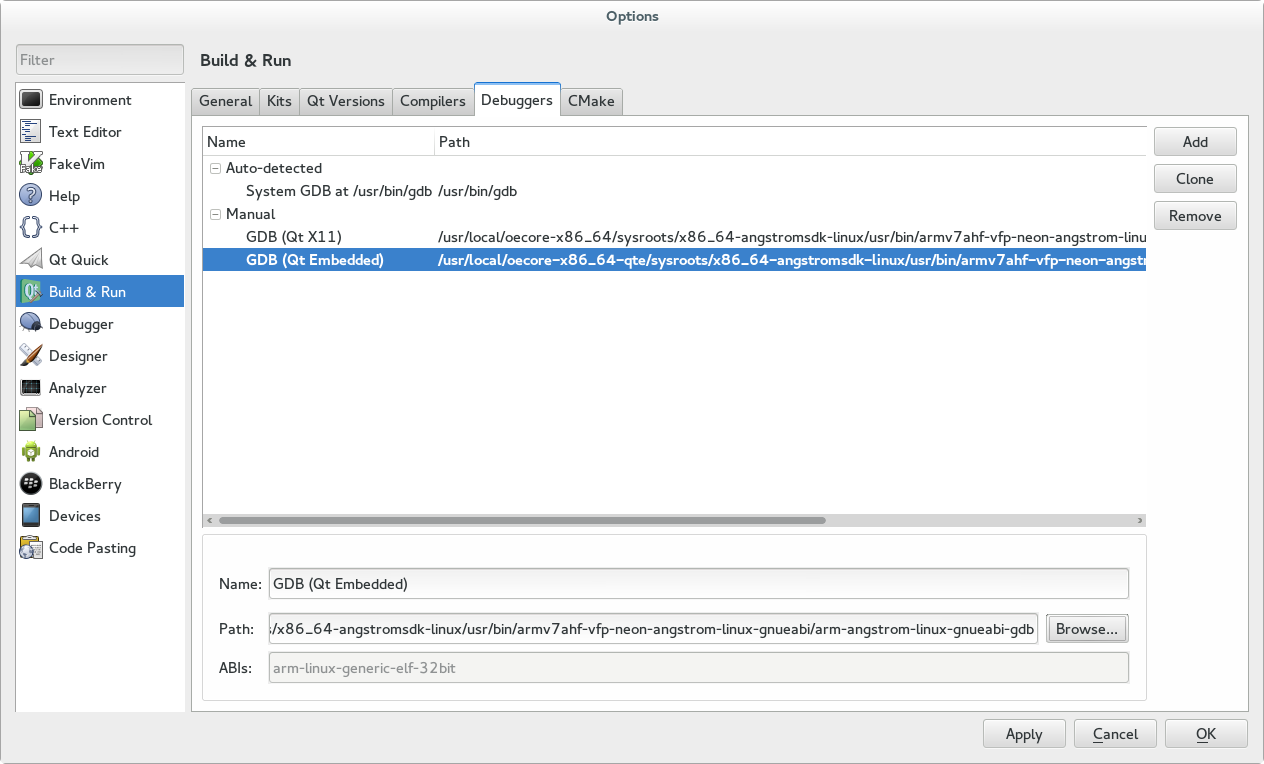
Debuggers:
- Press Add
- Name: GDB (Qt Embedded)
- Path: /usr/local/oecore-x86_64/sysroots/x86_64-angstromsdk-linux/usr/bin/arm-angstrom-linux-gnueabi/arm-angstrom-linux-gnueabi-gdb
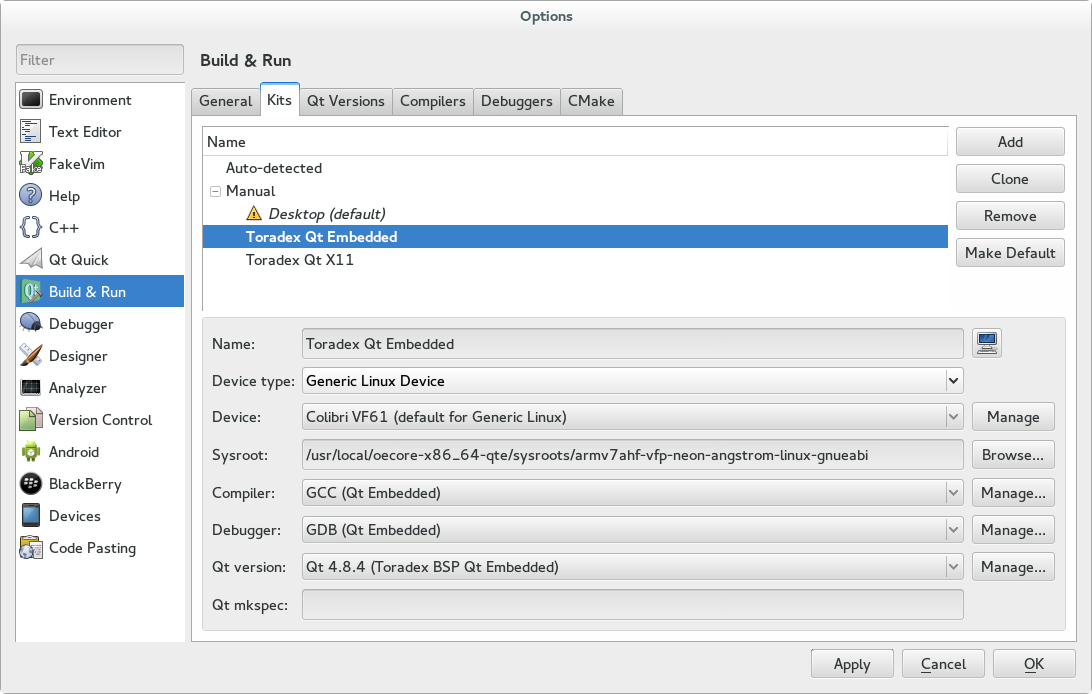
Kit
- Press Add
- Name: Toradex Qt Embedded
- Device: Apalis iMX6
- Sysroot: /usr/local/oecore-x86_64/sysroots/armv7at2hf-vfp-neon-angstrom-linux-gnueabi
- Compiler: GCC (Qt Embedded)
- Debugger: GDB (Qt Embedded)
- Qt version: Qt 5.8.0 (Toradex BSP Qt Embedded)
- Qt mkspec: leave empty
Now one can create a new project using the new Kit. Qt Creator automatically configures build configurations for the cross compiling Kit.
If you have an existing project, you can configure Build & Run Configurations under the Project tab on the left side. Go to Add Kit, we can now use the newly created Kit Toradex Qt Embedded.
Note: With Qt 5.7 from OpenEmbedded Morty release (BSP version 2.7 Beta1 and later) require Qt mkspec to be set as follows
/usr/local/oecore-x86_64/sysroots/armv7at2hf-neon-angstrom-linux-gnueabi/usr/lib/qt5/mkspecs/linux-oe-g++
Note: When using Qt Embedded, you may want to switch to the "Run" configuration and add the argument "-qws" to the binary as standalone (instead using the Qt for Embedded Linux server).
ERROR Shooting:
“c: Command not found” error
I built qt5-toolchain for ARM arthitecture successfully.But I receive following error while compiling any qt application:
Makefile:545: recipe for target 'moc_mainwindow.o' failed Wl,-O1 -o Demo1 main.o mainwindow.o moc_mainwindow.o -L/opt/poky/2.0.1/sysroots/cortexa7hf-vfp-vfpv4-neon-poky-linux-gnueabi/usr/lib -lQt5Widgets -lQt5Gui -lQt5Core -lGLESv2 -lEGL -lpthread Makefile:199: recipe for target 'Demo1' failed
make: c: Command not found
make: [moc_mainwindow.o] Error 127 (ignored)
make: Wl,-O1: Command not found
make: [Demo1] Error 127 (ignored)
After you have got the SDK and installed it in /opt, you will need to modify qtcreator.sh to add the environment setup.
so, locate /usr/local/oecore-x86_64/environment-setup-armv7at2hf-neon-angstrom-linux-gnueabi
edit Qt/Tools/QtCreator/bin/qtcreator.sh
add this line before the Shebang
source /usr/local/oecore-x86_64/environment-setup-armv7at2hf-neon-angstrom-linux-gnueabi